Linear Sliding Tribometer with Inline 3D Imaging
Inline Integrated Profilometer to look at surfaces with nanometer resolution
Inline Integrated Profilometer to look at surfaces with nanometer resolution
This application note shows how the MFT-5000 can be used to study materials, coatings and lubricants in linear wear friction testing setup. The test covers a laboratory procedure for determining the wear and friction of materials, liquid and lubricants etc. during sliding using a pin on plate tribometer or ball on flat tribometer setup.
Module Features:


Materials are tested in pairs under nominally non-abrasive conditions. For the pin on plate tribology wear test, two specimens are required. One, a pin or ball that is positioned perpendicular to the other, usually a flat plate. The universal upper and lower sample holders are used to mount the samples. Common test specimens are 100Cr6 steel ball of 10mm diameter and a 100Cr6 plate. Samples of other materials and diameters can also be easily accommodated in the tool. The surface flatness and roughness of both materials are critical to get repeatable results.
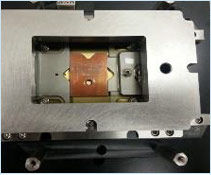
The linear reciprocating tribometer pushes a stationary pin or ball to press against the oscillating plate at a determined force and moves it in a linear reciprocating manner at the set frequency. During the test coefficient of friction (CoF), friction force, wear and several other parameters are measured and reported. The image shows the top view of the set up for lubricant container in which samples can be tested in lubricated conditions.
The figure below shows the friction curve from a typical reciprocating test. It shows the comparison of two different test samples tested at 200°C under similar conditions of load (200N) and frequency against a 10mm Cr6 ball. It is clear from the test that sample 2 has higher friction compared to sample 1. The change in friction values from negative to positive corresponds to the change in direction during the test. The data can be collected up to 5000 points per second. Several other channels such as temperature, coefficient of friction, wear etc. can also be recorded during the test. The high-end electronics and the high data acquisition rates makes it possible to get useful insights in the test including the static to dynamic peaks as the test changes direction.


The Rtec Instruments multi-function tribometer comes with an optional inline 3D Profilometer. The Profilometer automatically measures the surface topography of the wear track at intervals defined by the user e.g. after a certain number of cycles, duration of time or at the on-set of an event such as increase in friction. The XY stage is equipped with advanced encoders to automatically move the sample between the test and image area. The ability to characterize the change in surface topography and wear track with time and combining it with friction data makes the analyses extremely powerful.
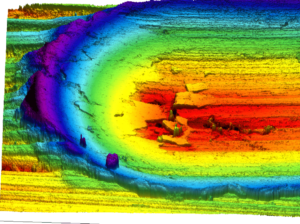
The initial 3D image acquired using the Profilometer also allows to account for machining marks, grain boundaries, orientation of the samples and other localized features in contact surfaces. This information can be useful to explain difference in friction, stick slip and wear between specimens. The image below shows the wear mark created vs time on an aluminium sample during a 2.5 hour ball on plate linear reciprocating test. The images were taken every 10 minutes. The entire wear scar was stitched to characterize the wear vs. time.

The Rtec Instruments Multi-Function tribometer MFT-5000 is globally regarded as the most versatile and technologically advanced tribometer. The patented integrated 3D Profilometer allows analysing surface change vs. time makes it usable for many applications across various industries. In addition it comes with patented force sensors (piezo, capacitive & strain gauge) with ultra-low resolution, highest speeds, stable torque and widest load range than any other commercially available tribometer.

3D Imaging of wear track by using the integrated optical Profilometer with 4 techniques
White Light Interferometer: Allows to image flat surfaces
Confocal Imaging: Allows to measure dark, rough and transparent surfaces
Dark Field Imaging: Allows to find scratches, wear tracks and defects with high contrast
Bright Field Imaging: Allows to create 2D profiles with true colour
MFT-5000 linear sliding wear tribometer module is an excellent option for running tests in reciprocating mode to study tribological performances, wear resistance at various contact loads for research or engineering components under wide range of sliding wear conditions. To study tribological properties the tool can be operated in dry or lubricated mode with options to do the tests at high temperatures. The inline Profilometer makes this tester a very powerful tool in the hand of the researcher or QC engineer.